
Hackathon 0x0c - Testing Nexus Repository Manager
Background
At Intersec, we have produced and installed multiple applications over the years, and installed them on multiple platforms (various OS) for many customers all over the world.
Today some of these applications are in a “maintenance only” mode (we no longer add features to them). However, we must keep the artifacts (mainly packages for Debian and Red Hat) currently installed on the customer’s premises.
We also regularly build new versions of our “active” products (to add new features and bugfixes), also on multiple OS. And we have continuous delivery pipelines which create “nightly” builds for our internal development and test platforms.
This background causes some issues:
- For historical reasons, all the artifacts are stored on an internal NFS share, which lacks many features, such as advanced permissions management or auditing features.
- Over the years, the “logic” to store the packages has evolved: having a consistent list of directories for each version is cumbersome (you need to know the logic to find the packages).
- Our NFS store is a simple disk share (in RAID) but expanding this storage is always painful as it requires manual intervention from our technical team.
For these reasons, we decided to test a new way to deliver and store our build artifacts, based on more modern technologies:
- Nexus Repository Manager
- S3 storage
Nexus setup
As described in the Nexus Repository Manager installation guide, the process is very simple (at least for a single-site setup with no redundancy, which was a perfect fit for our 2-day Hackathon run):
- extract the archive
- simply run
./nexus start
That’s all!
Basic configuration and administration
We won’t go into too much detail on these subjects, because they are well explained in the product user’s guide.
Two main things were done:
- create an “S3 blob store”
- create repositories for apt, RPM and a “raw” one
S3 blob store
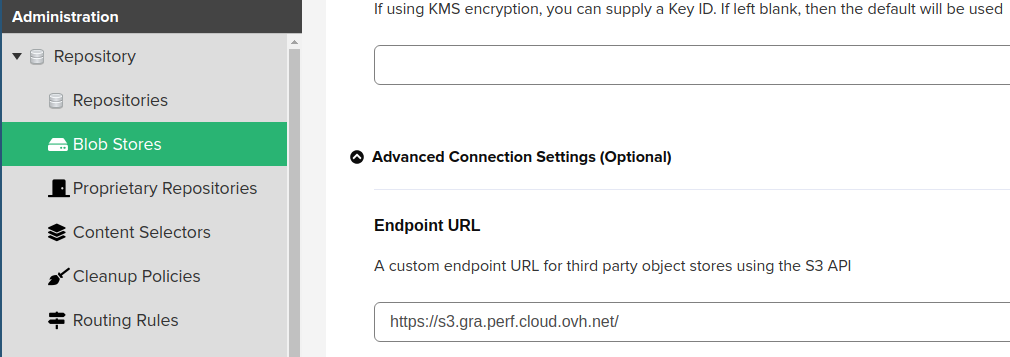
After provisioning a new S3 storage in OVH, making Nexus work with it was an easy task (when you are not using an AWS S3 endpoint you can go to the “Advanced connection Settings” part and configure the appropriate path to your endpoint).
YUM and pypi repositories
Nothing fancy to be done here: you just click on “Create repository” in the GUI and the defaults are enough to have a working repo for these formats of artifacts. We call the repo “nexus-yum”.
APT repository
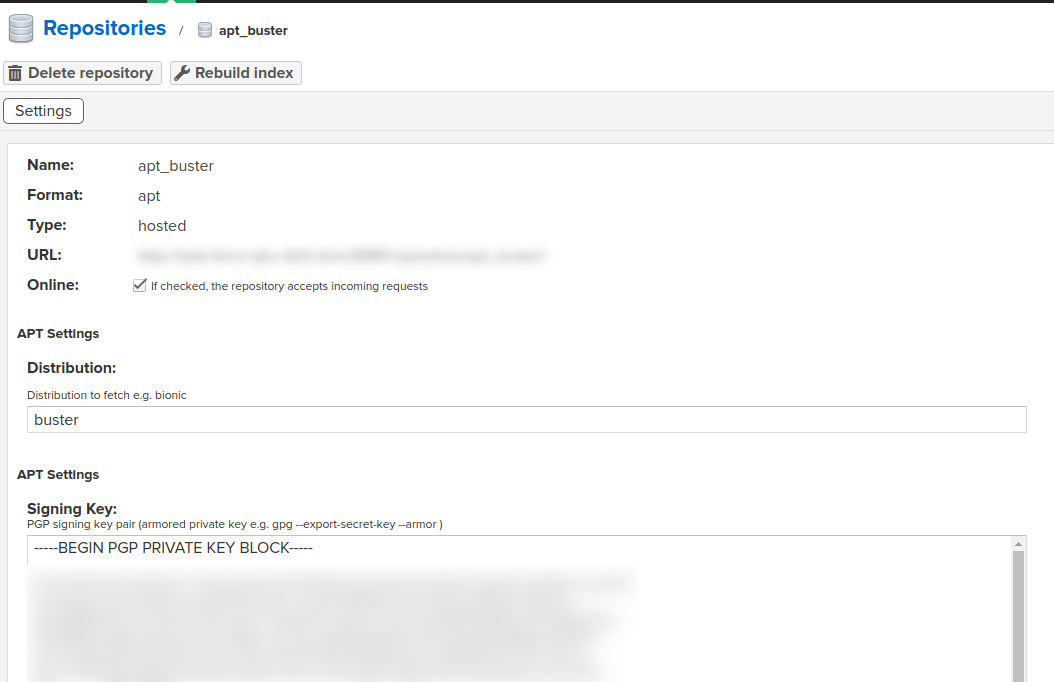
Initially, this format was not managed by Repository Manager, but the community contributed with a plugin, and it is now activated by default for new installations.
The only difficulty here is that it is required to have a PGP signing key so that your APT repo is valid. The client will then have to “trust” the public version of the key. To generate the signing key:
$ gpg --generate-key
Just give a name to the key and accept the default options (of course you SHOULD add a passphrase if the key is used in a production platform). For a key named “Nexus repomanager” you then obtain the private key with
$ gpg --armor --export-secret-keys "Nexus repomanager"
Put this key in the form while creating the APT repo in Nexus:
Integration with our build system
Here comes the funny part: instead of publishing the build artifacts on the NFS share, we now have to push them to the Repository Manager.
To build our products, we use Buildbot ; so in our case, the integration of Nexus Repository Manager consisted in invoking the upload APIs from the build factory.
In the perspective of “migrating” our current NFS to the S3 storage, it would be interesting as well to have a script that takes a directory in parameter and uploads its content to Nexus (choosing the appropriate “repository” depending on the format of the file).
The “quick and dirty” code
During a Hackathon, we love writing dirty code if it works! This is the case here:
#!/usr/bin/env python3

import argparse
import sys

import requests

SUPPORTED_TYPES = ['apt', 'yum', 'raw', 'pypi']

HELP_FILE = 'The name set in the repository for the uploaded file'
HELP_PATH = 'The path of the file to upload'
HELP_FILE_TYPE = 'The type of the artefact to upload'
UPLOAD_USER = 'upload_user'
UPLOAD_PASSWORD = 'upload_password'
UPLOAD_ADDR = (f'http://{UPLOAD_USER}:{UPLOAD_PASSWORD}'
               '@ADDRESS_OF_YOUR_NEXUS_SERVER/service/rest/v1/components'
               '?repository=')
POST_HEADERS = {'accept': 'application/json'}
REPOS = {'apt': 'apt_buster',
         'yum': 'nexus-yum'}


def upload(file_type, file_name, file_path):
    if file_type not in SUPPORTED_TYPES:
        print('Type not supported')
        sys.exit(1)

    payload = open(file_path, 'rb')
    full_url = UPLOAD_ADDR + REPOS[file_type]
    if file_type == 'apt':
        data = {'apt.asset': (file_name, payload)}

    elif file_type == 'yum':
        data = {'yum.asset': (file_name, payload),
                'yum.asset.filename': (None, file_name)}

    elif file_type == 'raw':
        data = {'raw.asset1': (file_name, payload),
                'raw.asset1.filename': (None, file_name)}

    result = requests.post(full_url, files=data, headers=POST_HEADERS)
    print(result)


def main():
    ARG_PARSER = argparse.ArgumentParser()
    ARG_PARSER.add_argument('type', help=HELP_FILE_TYPE)
    ARG_PARSER.add_argument('file', help=HELP_FILE)
    ARG_PARSER.add_argument('path', help=HELP_PATH)
    args = ARG_PARSER.parse_args()
    file_type = args.type
    file_name = args.file
    file_path = args.path
    upload(file_type, file_name, file_path)


if __name__ == '__main__':
    main()
#!/usr/bin/env python3
"""
1 argument only: the path of a directory. Everything inside will be uploaded/
"""

from pathlib import Path
import sys

from upload_nexus import upload

EXTENSIONS = {
    '.rpm': 'yum',
    '.deb': 'apt',
    '.py': 'pypi',
    '.pyc': 'pypi'
}


def main():
    src_dir = Path(sys.argv[1])
    for fic in src_dir.rglob('*'):
        # Get the extension of the file, its name and
        # invoke the upload script accordingly
        file_name = fic.name
        extension = fic.suffix
        if not (fic.is_file() and extension in EXTENSIONS):
            continue
        file_type = EXTENSIONS.get(extension, 'raw')
        print(f"Uploading {file_name}...")
        upload(file_type, file_name, str(fic))


if __name__ == '__main__':
    main()
The first script is a generic script that can upload .rpm, .deb or any other file format to the appropriate repository in Nexus. It takes in input the type, the name of the file (as it will appear in the repo) and the path of the file to upload.
The second script is the one responsible for invoking the upload method defined in the first module. It will invoke it while iterating over all the files present in the directory given in input. This is the script that is called by Buildbot when the build is finished and that all the artifacts are present in a directory on the Buildbot worker.
Checking the repositories
Now that we produced build artifacts and uploaded them to Nexus, it would be nice to double check that we can install the new packages.
APT
Remember when we created a gpg key in APT repository ? When adding Nexus repo in a Debian sources.list file, we need to explicitly give the public key of the gpg key. Get this public key and save it in repomanager.pgp:
gpg --export "Nexus repomanager" > repomanager.pgp
Then save this file to /usr/share/keyrings/repomanager.pgp for example on your client Debian machine and add the following definition of repository in /etc/apt/sources.list:
deb [arch=amd64 signed-by=/usr/share/keyrings/repomanager.pgp] http://[ADDRESS OF NEXUS]/repository/apt_buster buster main
An “apt get update” then refreshes the local APT cache and it is now possible to install a package deployed to Nexus Repository Manager.
RPM
Add the definition of Nexus RPM repository in /etc/yum.repos.d/nexus-aws.repo for example:
[nexus]
name=Extra Packages for Enterprise Linux 7 - $basearch
baseurl=http://[ADDRESS OF NEXUS]/repository/nexus-yum/
failovermethod=priority
enabled=1
gpgcheck=0
It is now possible to install build artifacts pushed by Buildbot.
Conclusion
We did not have time to explore all the features of Nexus Repository Manager, but we managed to integrate it to our build system and were able to use Nexus as the source to fetch the packages from Debian and Red Hat machines.
Before using this kind of setup in production for all releases, we need to make some improvements:
- The packages are currently uploaded to an external S3 storage (OVH); we need to add an encryption system before sending the files. Nexus manages this setup by leveraging on KMS applications (using AWS one by default, but it might be possible to plug it to a third-party one like HashiCorp Vault for example).
- Some retry mechanism could be developed in case Nexus platform is not reachable during a build. We could also fallback to the “good old NFS” share and send an alert message in that case.